In MOSS, you could use the “Set up groups” option within a site to create and assign the default Member, Owner, and Visitor groups.
In 2010, the “Set up groups” link does not appear.
The “Set up Groups for this Site” page is hidden for SharePoint 2010. You can still get to this page by url:
…/_layouts/permsetup.aspx
[The above was excerpted from this technet article.]
Mar 12
14
Set up RMS on client side
Once AD RMS is set up on the server, you need to set it up for the end users to actually use the AD RMS functionality. This is a 2-step process:
1. Install/validate RMS client on client machines
2. Use RMS within Office apps (Word, Excel, PowerPoint, and Outlook)
RMS client on client machines
The AD RMS client comes installed out-of-the-box on Microsoft end-user operating systems Vista, Windows 7, and Windows 8 as well as the server operating systems of Windows Server 2008 and Server 2008 R2. However, earlier versions of Windows (i.e. Windows XP or Windows Server 2003) require the manual installation of the RMS client. [Note: the client is actually just one file: msdrm.dll (Microsoft Digital Rights Management -dot – dynamic link library) which can be found in the %windir%/system32 directory.]
If you need to install the AD RMS client manually, first determine the operating system platform, the service pack installed (if any), and the architecture (32-bit or 64-bit) of the machine where you want the client installed, then visit the Microsoft AD RMS client page to download the correct AD RMS client version.
RMS in Office apps on client machines
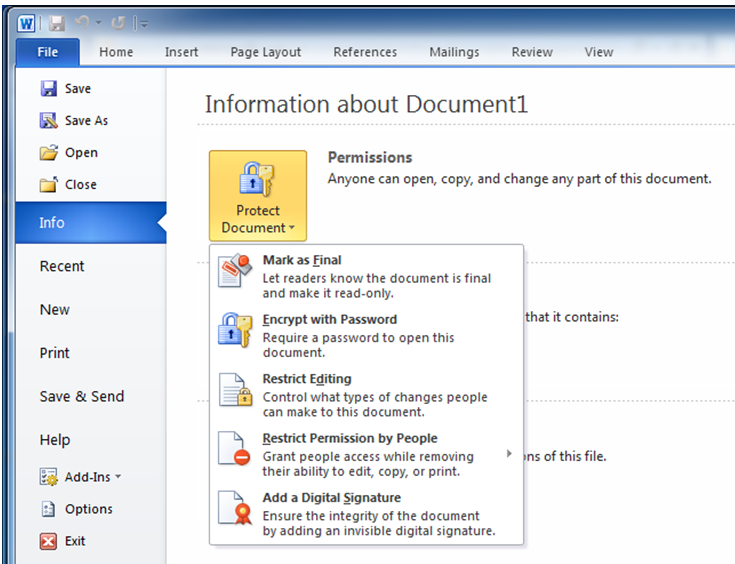
Once the proper RMS client is installed, you need to set up Office 2010 to use the RMS functionality. Microsoft has posted a helfpul article called Information Rights Management in Office 2010 that covers the process pretty well. Essentially, once RMS is set up, users simply need to click File, Info, and then select the restriction settings they want. Piece of cake. See below for Word 2010 Professional.
Additionally, if you would like to add a ribbon command for Protecting documents in Word 2010, it’s a fairly elaborate process, honestly. Check it out. Some of your users will prefer this method (the ribbon command) while others will prefer the “standard” way of clicking Info from the File menu. Either way, you’ll have covered both of your bases.
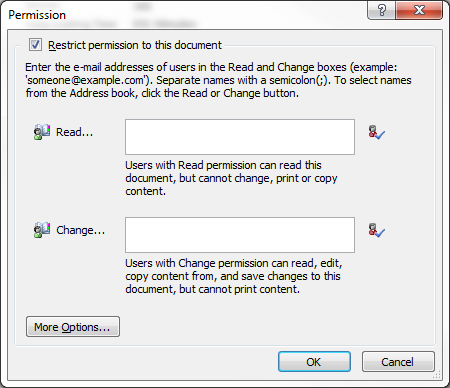
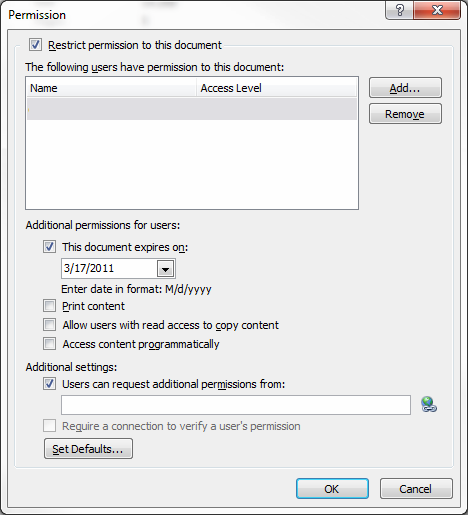
These instructions work for both Office 2010 and Office 2007 Professional versions, however, RMS will also work with Office 2003 Professional. For Office 2003 Professional the process is simply to click the File menu, and select Permissions from the dropdown. Then, simply follow the prompts. You will be prompted for which users and/or groups are to have access followed by a screen where you select the individual permissions to be restricted. See below. Piece of cake.
Final
After you have set up the client’s machines for the RMS client and you’ve set up Office 2010 to use RMS functionality, you’ll want to train the users on how to follow the process of protecting their documents, e-mails, spreadsheets, and powerpoints. At that point, you will have completed the AD RMS mission.
After I finally got AD RMS up and running, the next task was then to integrate it with SharePoint 2010. This seemed simple:
1. Go into Central Admin in SharePoint 2010 on a Web Front End (WFE) Server,
2. Click Security,
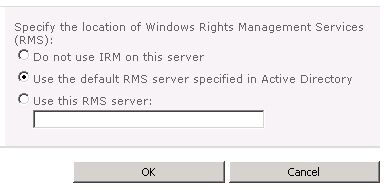
3. In the section Information Policy, click Configure information rights management,
4. Choose one of the three options:
- Do not use IRM on this server
- Use the default RMS server specified in Active Directory
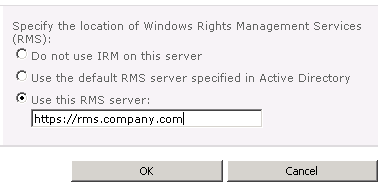
- Use this RMS server (it then allows you to type in the url for your AD RMS server)
My initial choice was the third option.
I typed in my AD RMS url and then clicked the OK button. It failed. I double-checked the url and it was right. What could be the problem?? After careful reading of Google’s findings on the subject, I chose the second option (“use the default RMS server specified in Active Directory”)… and it failed again. After going back to Google again, I found this article about integrating SharePoint 2007 with IRM which gives the important steps of Permissions – you must enable the SharePoint 2010 WFEs to access the AD RMS server certificate. Got it. Here are the steps from the above article by David Lim which are as relevant to SharePoint 2010 as they were to SharePoint 2007.
- Log on to the AD RMS server as a local administrator
- Click Start, and then click Computer
- Navigate to c:\Inetpub\wwwroot\_wmcs\Certification
- Right-click ServerCertification.asmx, click Properties, and then click the Security tab
- Click Advanced, click Edit, select the Include inheritable permissions from this object’s parent check box, and then click OK two times
- Click Edit
- Click Add
- Click Object Types, select the Computers check box, and then click OK
- Type the name of the SharePoint web front-end server, and then click OK twice.
- Repeat the above three steps for other web front-end servers
- Click OK to close the ServerCertification.asmx Properties sheet. By default the Read & Execute and the Read permissions are configured
- Reset IIS
Now you can go back into Central Admin on a WFE, Security section, Configure information rights management, and select the 2nd option: Use the default RMS server specified in Active Directory.
It should work this time. For me it did.
Final Step: After you take these above steps, site and document library administrators are able to enable IRM on any document library to which they have the appropriate permissions.
Mar 12
12
How to re-install AD RMS
I inherited a partial installation of AD RMS. The previous IT guy had simply installed the AD RMS and IIS roles on the box and assigned a url for the cluster. Unfortunately, it was not the correct url so I needed to “remove the cluster” which sounded like a total mess. Since AD RMS had not been in production yet (and thus no certificates had been issued and no documents protected) it made perfect sense to just delete everything and start from scratch. I looked high and low on the Internet for the information I am about to provide. I wasn’t successful in finding much help on the matter so I’m sharing my steps with you here.
Just so you know, when you install the AD RMS server role on Windows Server 2008 R2 (which runs the AD RMS installation wizard), it reaches out and creates several things in your enterprise:
1. It creates a Service Connection Point (SCP) in Active Directory
2. It creates two databases in SQL Server (configuration and logging)
3. It integrates with IIS on the server and/or installs the IIS server role if it wasn’t installed already
For any reason, if the installation needs to be performed again, you need to clean up all of these touch points.
First, remove the AD RMS and the IIS server roles. You also need to clean up the databases that are created in SQL Server (configuration and logging) by taking them offline and then deleting them in SQL Server Management Studio. Then, remove the SCP created by AD RMS in Active Directory (see the posting just previous to this one).
Reboot the machine.
When it comes back up, simply Add the following roles: AD Rights Management Service and IIS and follow the wizard.
Mar 12
12
AD RMS installation error
Error Msg: Attempt to configure Active Directory Rights Management Server failed. The AD RMS installation could not determine the certificate hierarchy. If the AD RMS service connection point (SCP) you need to use is registered in Active Directory but is not valid, revise it to make it valid, or create a new SCP, and install AD RMS again…
If you are receiving this error, it’s probably because of a previous installation (or failed installation) of AD RMS. When AD RMS is installed, the wizard reaches out to your Active Directory controller and creates a Service Connection Point (SCP) there. Later attempts to install will fail because they cannot overwrite the existing SCP. You’ll simply need to delete it. A poster named Sally.Mark contributed the below which worked for us:
Just wanted you to know that I was able to solve this problem. For anyone else who may someday come across this problem. What I did to solve it was, on AD computer, I opened the run command and then ran ADSIedit.msc. The ADSI edit MMC window popped up and I browsed down to Configuration and then expanded the first node, then expanded Services and then I deleted the SCP that said CN=RightsManagementServices. I deleted the whole thing and subfolders and then I went back and reinstalled AD RMS on my server. This time it worked perfectly.
Mar 12
12
Website launch
SharePoint in Depth ambitiously attempts to cover a full install of SharePoint 2010, hitting all the high notes and going deeper on occasion. The main purpose of this site is to provide a repository of “gotchas” that I encounter so that I don’t have to remember them all.
Of course, SharePoint 2010 operates on top of Windows Server 2008/R2 and along with IIS 7 and SQL Server 2005/2008. We’ll cover these too. SharePoint 2010 also cooperates really well with AD RMS (Active Directory Rights Management Services) to provide a robust security scheme for your enterprise; I’ll chronicle RMS as well along the way.
Douglas E. Spicer, MCITP
-
Recent Posts
- Sign up for the Robinhood Gold Card!
Click the image below. Archives
- March 2025
- November 2024
- September 2024
- August 2024
- July 2024
- February 2024
- January 2024
- November 2023
- October 2023
- January 2023
- November 2022
- September 2022
- July 2022
- June 2022
- April 2022
- December 2021
- May 2021
- November 2020
- August 2020
- July 2020
- June 2020
- May 2020
- April 2020
- August 2019
- January 2019
- June 2018
- October 2017
- August 2017
- April 2017
- March 2017
- September 2016
- August 2016
- June 2016
- May 2016
- April 2016
- March 2016
- November 2015
- September 2015
- August 2015
- April 2015
- March 2015
- February 2015
- January 2015
- November 2014
- October 2014
- September 2014
- August 2014
- July 2014
- June 2014
- May 2014
- April 2014
- February 2014
- September 2013
- August 2013
- May 2013
- June 2012
- April 2012
- March 2012
Categories
Meta
Links
- A Complete Guide to SharePoint Online List and Library Formatting
- Adventures of SharePoint On-Prem
- David Sterling
- Free SharePoint eBooks
- Get-SPScripts: PowerShell scripts for SharePoint
- How-To Guide for SP Cumulative Updates
- Josh Roark at Microsoft
- Salaudeen's SharePoint Diary
- SharePoint Clever Workarounds
-
Unauthorized use and/or duplication of this material without express and written permission from this blog’s author and/or owner is strictly prohibited. Excerpts and links may be used, provided that full and clear credit is given to the specific author and SharePointinDepth.com with appropriate and specific direction to the original content.
